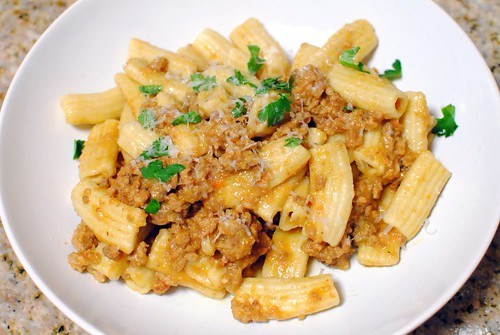
Fresh Rigatoni with Ragu Bolognese
Dining date: 2/5/12

I recently purchased a KitchenAid stand mixer (due to a deal I could not refuse) and immediately had dreams of freshly baked breads, cookies and pastries. However, while researching optional attachments, I came across the pasta extruder, a play-doh like attachment that basically pushes dough into various shapes to be cut. I had to have one.
I’ve made fresh pasta once before a couple of years ago with a manual pasta roller…it’s been sitting in the cabinet ever since. I found it to be pretty difficult and time consuming, and my result wasn’t even up to par with dried pasta. However, the extrusion method is much easier. Basically, a dough is made and pushed through various dies to create different shapes, then are cut manually. No need to roll pasta over and over.
Inspired by this post on food, je t’aime I set out to make fresh rigatoni with a ragu bolognese from the Mozza cookbook. The ragu was fairly easy – it took a lot of time (most of it idle), but had a lot of room for error. The pasta, on the other hand, had to have a dough that was just right. One thing’s for sure; every chef and cookbook has their own pasta recipe. I tried a number of them, but so far have found this one to work best for me. Interestingly, it requires no eggs, no kneading and no resting.
Pasta dough (food, je t’aime)
5 oz all purpose flour
5 oz semolina flour
4 fluid ounces warm water
1. Weigh flour and place in bowl of stand mixer.
2. With the paddle attachment, mix on low slowly dribbling in water to produce a wet and crumbly dough.
The dough is cut into walnut-sized pieces and fed into the extruder. It’s pretty fun to do (as long as it turns out well) and makes fresh pasta pretty quickly. The dough is the tricky part; if it’s too sticky/wet, the pasta won’t hold its shape and will get stuck together. If it’s too dry, extrusion becomes noticeably more difficult and the resulting pasta becomes too dense.


To pair with the rigatoni, I went with Mozza’s ragu bolognese.
Ragu bolognese (The Mozza Cookbook)
2 tablespoons extra virgin olive oil
8 garlic cloves
2.5 ounces pancetta, roughly chopped or ground
1 cup soffritto
1/2 of a 4.5 ounce tube double-concentrated tomato paste
1 pound ground veal
1 pound ground pork
2 teaspoons kosher salt
1/2 teaspoon freshly ground black pepper
1/4 teaspoon freshly ground nutmeg
1 cup dry white wine
3 cups chicken stock
3/4 cup whole milk
1. Combine oil and garlic in bowl of a food processor. Add pancetta and puree until ingredients form a homogenous paste.
2. Cook mixture over medium heat until the fat from the pancetta is rendered, about 5 minutes, stirring constantly to prevent the garlic from browning.
3. Stir in the soffritto and cook for about 1 minute.
4. Move the vegetables to create a bare spot in the pan, add the tomato paste to that spot and cook for 1 minute.
5. Add veal and pork, season with salt, pepper and nutmeg and cook, stirring occasionally, until all of the juices released from the meat have cooked off and the pan is almost dry, about 10 minutes.
6. Add the wine, increase heat to medium high and cook until the wine has evaporated and the pan is almost dry, about 10 minutes.
7. Add the chicken stock, bring it to a simmer, reduce heat and simmer for about 2 hours, stirring occasionally, until the stock has almost all cooked off but the pan is not completely dry.
8. Add the milk and simmer until the ragu returns to a thick, saucy consistency, 30-40 minutes.
9. Use the ragu, or allow it to cool to room temperature and refrigerate in an airtight container.
Finishing the pasta
Kosher salt
3/4 cup chicken stock or pasta water
3 teaspoons unsalted butter
12 ounces pasta
6 tablespoons extra virgin olive oil
3 tablespoons freshly grated Parmigiano-Reggiano
3 tablespoons freshly grated pecorino romano
1. Combine 1.5 cups of the ragu, the chicken stock and butter in a large saute pan over medium heat.
2. Stir ingredients to combine and heat until the butter is melted and sauce is warmed through, adding more chicken stock if necessary to obtain a loose sauce consistency.
3. Turn off the heat while the pasta is cooking.
4. Cook pasta until 1 minute from being done.
5. Place sauce over high heat. Lift pasta out of cooking water, drain and immediately add to the pan with the sauce.
6. Cook the pasta with the sauce for 2 minutes, stirring gently with a rubber spatula so you don’t tear the pasta. Add pasta water if the pasta is dry and sticky instead of slippery and glistening.
7. Turn off the heat and add the finishing quality olive oil, stirring vigorously and shaking the pan to emulsify the sauce.
8. Add the grated Parmigiano-Reggiano and pecorino romano and stir to combine.
9. Plate pasta and use a microplane or fine grater to grate a light layer of Parmigiano-Reggiano over plate and serve.


Expectantly, the ragu was the easy part (technically) though there were a lot of steps. As expected, it exhibited a rather rich (there’s a lot of fat) and luscious sauce, definitely meaty. Simple and delicious. I added a little bit of chopped parsley on top.
Over the course of a few days, I prepared various batches of pasta and came up with some I thought were pretty good and some that were just bad. While I liked the taste and texture of my “pretty good” pasta, they didn’t hold their shape very well, falling in on themselves.
These held their shape perfectly, but were way too dense.

My understanding is that the ideal dough for extrusion is different from one that goes through a pasta roller (particularly with the kneading and resting period), though I’m not entirely sure. For some reason, pastas in which I added egg, kneaded, and rested turned out way too sticky. If anyone has a pasta extruder and tips to share, I’d love to hear them!
Even if it didn’t turn out perfectly, it looks amazing. I also have a manual pasta roller and have used it exactly 5 times because it’s such a pain, and have been debating getting an attachment for my KitchenAid as well. If you do find the perfect dough for the extruder, please post it! I will probably get the attachment sooner rather than later.
Thanks! I will make other posts as I get better on this!
I bet you’re gonna be a pasta expert in no time! Keep pluggin away, D. And just in case you forgot, I’ll happily eat your messed up batches 😉
Thanks for the encouragement. Hah, I can’t give you the messed up batches!