Macarons

Macarons are always some of the most attractive confections in the display case of a bakery or sweets shop. The brightly colored small cookie “sandwiches” are often some of the most expensive treats per bite too, often being at least a couple of bucks for something that’s just a couple of bites. Why are they so expensive? They’re relatively labor-intensive and require a bit of specialized technique – something I definitely have not considered experimenting with at home.
So when Hong & Kim of The Ravenous Couple invited me and a few friends over for a macaron party/class of sorts, I jumped at the chance. I mean, when else was I going to get the opportunity to learn how to make macarons? Plus, it would be the perfect opportunity to break in my new KitchenAid mixer.
When we arrived, we were greeted with a properly organized set-up. Various stations around the kitchen were put together for each stage of the macaron-making process from the weighing station to mixing to sifting to macronage to piping, and finally to the feet station.


Kim started by demonstrating with the first batch, then we split up to make our own. We utilized a recipe from BraveTart, a huge resource on macarons (and everything else sweet).
We spun the dry ingredients in a food processor then sifted them; egg whites and sugar were mixed in a few stages (for a total of 10 minutes) to get the consistency we wanted. This is where the food coloring and flavor extracts would be applied as well, the step which would make each of our macaron batches unique.

Dry ingredients were folded into the meringue, a step called macronage.

Finally, the mixed ingredients were piped onto a silpat baking mat, very carefully. A template was key for us beginners!


Once they rested and settled, they were ready for the oven and the feet station. I had no idea what this was coming in, but the feet are the distinct ruffled edges around the circumference of the cookie, the part with a very light and airy texture. Apparently, good feet are hard to consistently develop but I’m happy to say each of our batches developed them!

Once cooked, the cookies were ready to be sandwiched with the filling of our choice.


Here’s a tally of some of the ones we made that day:
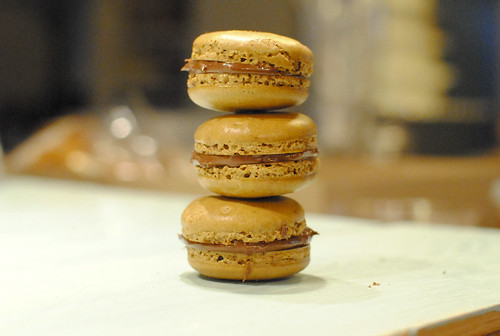
Coffee with chocolate ganache.
Pistachio with nutella.

Meyer lemon with fresh meyer lemon curd.

Ube with ube jam.

Rose with chocolate ganache, orange with fresh blood orange curd, and durian (not my favorite!) completed the full lineup.
These were pretty tasty if I do say so myself. To be honest, I was kind of surprised how they turned out given that all of us were complete newbies to the process. I thought we achieved a nice, light cakey shell with a soft but yielding texture. While I would like to say that making these was easier than I expected it to be, most of that was attributable to the careful step-by-step guidance we received. I’m pretty sure these would’ve been terrible had I tried to make them by myself. Thank you to Hong & Kim for hosting this party and showing us the ropes!
it was loads of fun and thanks for being part of it. let us know if u make a batch!
Haha will do!
Fun times!! favorite = ube
Ha! My fav was the meyer lemon…and not just cuz that was the batch I made (but mostly).
congratulations, DD! you’ve just signed yourself up to be my macaron coach. 🙂
ps: they were delish!
Uh oh I better get practicing! Glad you enjoyed them.
You make it seem so easy! I don’t want to admit how many batches of macs I have ruined.
Hah yeah it was surprising how it turned out! I don’t dare say I would be able to duplicate that success in at least the first few batches I do alone.